
L'Oreal Infallible Eye Shadow in Smoldering Plum


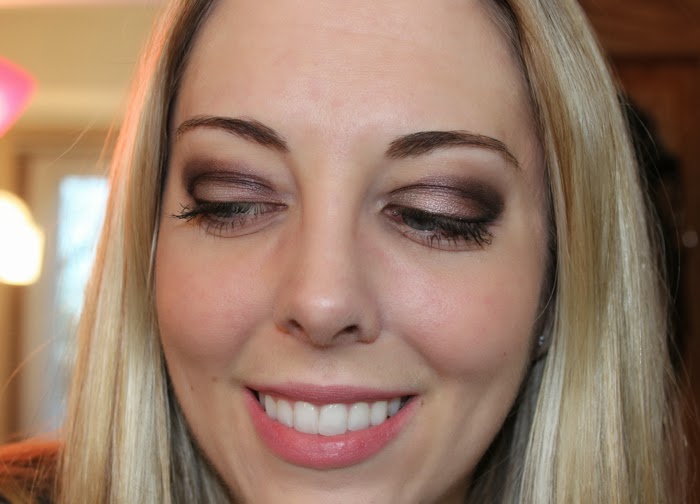
This look is using L'Oreal's Infallible shadow in Smoldering Plum. I had heard these were decent shadows for a drugstore brand and thought I'd pick one up. This was a really nice shimmer plum color and it has great pigmentation. If you haven't noticed by now, I like eye shadow palettes versus single shadows, so I'm not sure I would try another shade. However, if you're looking for a single shadow that's not too expensive, I would recommend this one. It's just a really versatile shadow with great payback. For this look, I combined this shadow with a couple others from the Naked2 palette.


Step 1: Apply YDK (from the Naked2 palette) all over the lid.
Step 2: Apply L'Oreal Infallible Smoldering Plum precisely in the crease. Start by creating a line where your crease is. Then slowly start blending that up. If the original line gets blurred, go back and create that defined line. Just blend more and more as you work your way out.
Step 3: Use Busted (from the Naked2) in the outer third where you just have YDK to give some depth to your eye.
Step 4: Take the Infallible shadow again and apply it on the outer third of the lower lash line and extend it up at an angle to connect with where you applied the Infallible shadow in the upper lid. Bring this to a point.
Step 5: Line your upper lash line with blackout from the Naked2 palette. Extend this out into the point so it looks blended.
Step 6: Curl your lashes and apply mascara.

Popular posts from this blog

Urban Decay Naked 3 Tutorial

Pigs are flying! I finally used my Urban Decay Naked 3 Palette! Alright, so I only used two shades, but that's way better than I've done over the past 4 months. (Has it really been that long?) This look is super simple and really pretty for the spring. It's just a fresh, bright rosy look. Hope you enjoy! Step 1: Start with a base or primer. I uesd a Sigma Eyeshadow Base in Provoke which is just a nude base color. Then apply Burnout over all but the very outer corner of your upper lid. Step 2: Apply Buzz in the outer corner. Step 3: Line your top lash line with a dark brown to create a softer look. I used Stila Smudge Stick Waterproof Eye Liner in Damsel. Step 4: Line your waterline and inner corner in white. I used Rimmel London Soft Kohl Eye Liner Pencil in 07 Pure White. Step 5: Curl your lashes and apply mascara. I used a combination of L'Oreal Voluminous Carbon Black and L'Oreal Telescopic Carbon Black. Face: It Cosmetics ...

L'Oreal Telescopic Carbon Black Mascara

Let's talk mascara. I am in love with the L'Oreal Telescopic Carbon Black Mascara. I also love the Voluminous Carbon Black mascara, but it's a little difficult to work with, which prompted me to pick up the Telescopic mascara in the Carbon Black line. The Carbon Black line is exactly what it sounds like - meant to be a super black mascara, more than usual. The telescopic does not disappoint in this. I think it's even blacker than the Voluminous. To compare these two, the Voluminous is a volumizing more dry formula with a dense bristle wand, while the Telescopic is a lengthening, wet formula with a plastic applicator. (They do have a Telescopic mascara that isn't Carbon Black if you find the Carbon Black mascaras too black, like if you have lighter eye lashes.) Hopefully you can see from the above photo that this wand is a little different. It's a plastic applicator that has four sides. On each of the corners, it has the little spikes that a normal wand ...

Rihanna for Mac New Years Eve Look

I hope everyone had a very Merry Christmas! I really feel blessed this Christmas. Not just because I received a mandolin (yes!!) but because I was able to see all of my family. They have a way of reminding you who you are and keeping you grounded. It's just very special to see (almost) everyone, especially since all the cousins are getting older and starting to have their own kids. It will only get harder for everyone to get together and we always wonder if this will be the last year for this many people to be in the same room at once. Yes, blessed does not even begin to describe it. I broke down a while back and decided to join the crowd in the Rihanna for Mac collections. I purchased the RiRi Woo lipstick the first round, but didn't purchase anything the second round. But, there were just too many pretty pictures and videos of the second collection that I knew I had to buy something from the third. I ended up with a few things (read: too many) and am really loving them. ...