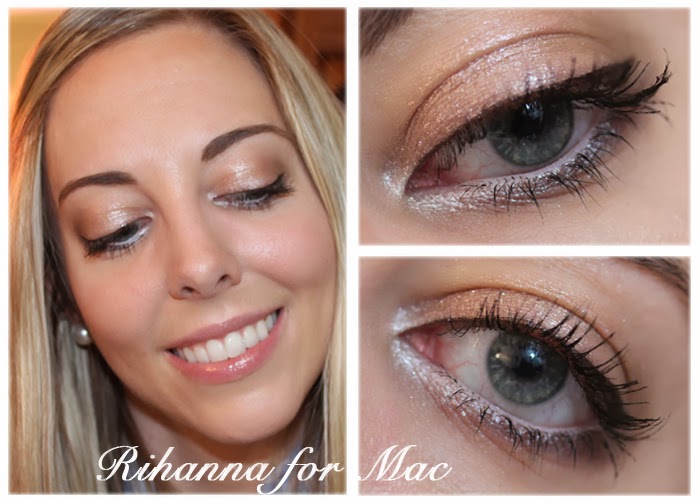
RiRi for Mac 2X Dare Eye Shadow Palette


Yep, back with another Rihanna for Mac Eye Shadow Palette. This palette, 2X Dare, is pretty similar to the other Rihanna palette, but I'm really glad I got both. They're different just enough to give a slightly different look. I think this could be another really pretty look that you could do for New Year's Eve too. Hope you have a good New Year!


Step 1: Apply the second rose gold shadow to the whole top lid, patting into place so that you don't get a ton of fall out.
Step 2: Apply the first cream shadow in the inner corner and take that down the bottom about a third of the way in. Then apply the third blue-ish shadow in the center of your bottom lid, blending with the cream on the inside and taking it almost to the outer corner.
Step 3: Apply the darkest shadow on the outer part of your bottom lid, bringing it up just slightly into the top lid area.
Step 4: Apply the fourth brown shadow on the top part of the outer corner to give a little dimension.
Step 5: Apply a black liquid liner to the top lid. I used L'Oreal Carbon Black Lineur Intense and winged it out just slightly.
Step 6: Curl your lashes and apply mascara. I used L'Oreal Voluminous Carbon Black on the top lashes and then used L'Oreal Telescopic Carbon Black on my bottom lashes and on the ends of my lashes top lashes.

Face: Benefit the POREfessional; Rimmel Match Perfection Foundation in 240 Soft Beige; L'Oreal True Match Concealer in Fair/Light, Bare Minerals Foundation as Concealer in Fairly Medium, and YSL Touche Eclat in 2 as under eye concealer; Rimmel Stay Matte Pressed Powder in 011 Creamy Natural; Hourglass Ambient Lighting Powder in Diffused Light; Mac Mineralized Blush in Dainty; RiRi for Mac Bronzing Powder
Eyebrows: Maybelline Define-a-brow in Light Blonde; Benefit Gimme Brow in Light/Medium
Lips: Revlon Lip Gloss in Snow Pink

Popular posts from this blog

Urban Decay Naked 3 Tutorial

Pigs are flying! I finally used my Urban Decay Naked 3 Palette! Alright, so I only used two shades, but that's way better than I've done over the past 4 months. (Has it really been that long?) This look is super simple and really pretty for the spring. It's just a fresh, bright rosy look. Hope you enjoy! Step 1: Start with a base or primer. I uesd a Sigma Eyeshadow Base in Provoke which is just a nude base color. Then apply Burnout over all but the very outer corner of your upper lid. Step 2: Apply Buzz in the outer corner. Step 3: Line your top lash line with a dark brown to create a softer look. I used Stila Smudge Stick Waterproof Eye Liner in Damsel. Step 4: Line your waterline and inner corner in white. I used Rimmel London Soft Kohl Eye Liner Pencil in 07 Pure White. Step 5: Curl your lashes and apply mascara. I used a combination of L'Oreal Voluminous Carbon Black and L'Oreal Telescopic Carbon Black. Face: It Cosmetics ...

L'Oreal Telescopic Carbon Black Mascara

Let's talk mascara. I am in love with the L'Oreal Telescopic Carbon Black Mascara. I also love the Voluminous Carbon Black mascara, but it's a little difficult to work with, which prompted me to pick up the Telescopic mascara in the Carbon Black line. The Carbon Black line is exactly what it sounds like - meant to be a super black mascara, more than usual. The telescopic does not disappoint in this. I think it's even blacker than the Voluminous. To compare these two, the Voluminous is a volumizing more dry formula with a dense bristle wand, while the Telescopic is a lengthening, wet formula with a plastic applicator. (They do have a Telescopic mascara that isn't Carbon Black if you find the Carbon Black mascaras too black, like if you have lighter eye lashes.) Hopefully you can see from the above photo that this wand is a little different. It's a plastic applicator that has four sides. On each of the corners, it has the little spikes that a normal wand ...

Too Faced Pretty Rebel Blue?

Someone please correct me if I'm wrong, but this makeup looks purple right? Not blue? Or am I going blind? I'm not really sure how that happened because the Too Faced Pretty Rebel Palette doesn't have any purple in it. Awesome picture taking abilities on my part I guess. =) Just ignore the purple and *imagine* blue. Step 1: Apply Badass as a base. This isn't very pigmented so just pile it on. =) Step 2: Apply Charming in the crease. This will kind of muddy up the blue shade, but we'll add a little more later to up the intensity again. Step 3: Take a pencil brush and apply Jailbird on the center of the lid and on the inner eye extending up into the crease. Blend slightly. Now go back and up the intensity with Badass. Step 4: Apply Badass to the lower lash line, using it lightly on the outer and inner third, skipping the middle. Step 5: Apply eyeliner to the top lash line. I used Maybelline Master Precise. Step 6: Just cu...